
Quick answer: To clean a beauty blender, wet it with lukewarm water, work a pea-sized amount of gentle cleanser or soap into the foam until the water runs clear, rinse fully, squeeze out the water, and air-dry it in an open, ventilated spot. Rinse after every use, deep-clean weekly, and replace it every 3 months.
Your beauty blender touches your face every single day. So when it’s dirty, it doesn’t just smudge your foundation — it spreads old makeup, oil, and bacteria straight onto your skin.
The good news? Cleaning it takes minutes. The trick is knowing the right way, because a quick splash of water barely does anything.
This guide covers everything: daily cleaning, deep cleaning, the viral microwave hack, drying, storage, and the warning signs that it’s time to toss your sponge.
What most cleaning guides don’t tell you (fresh insights)
Before the step-by-step methods, here are a few points that rarely show up in top-ranking articles — and that change how you should clean:
- “Looks clean” is not the same as “is clean.” The biggest misconception is that no visible makeup means a clean sponge. In reality, the microbial load is highest after the surface stain is gone — that’s when trapped product, oil, and dead skin sit deep in the core feeding bacteria.
- A plain water rinse only scratches the surface. Water alone lifts off the top layer of pigment but leaves silicones, oils, and biofilm locked inside the foam. You need a cleanser to break those down.
- Your tap water might be working against you. In hard-water areas, mineral deposits can cling to the sponge and lock buildup in place. A final rinse with distilled water can help in these regions.
- The “frozen beauty blender” TikTok trend is mostly hype. Makeup artists who tested it found little difference in the finish — and freezing an uncleaned sponge can trap bacteria. Skip it.
- Dermatologists now compare your sponge to your toothbrush. Personal, used constantly, and replaced on a schedule — not “whenever it looks gross.”
Keep these in mind as you read on.
Why cleaning your beauty blender actually matters
A makeup sponge is porous. It soaks up liquid foundation, concealer, cream blush, sweat, and skin oil — and it holds onto them.
Add a little leftover moisture, and you’ve created a warm, damp, food-rich environment. That’s exactly what bacteria, yeast, and mold love.
Dermatologists are clear on the risks. Board-certified dermatologist Dr. Debra Jaliman warns that a dirty sponge transfers bacteria back to your skin, which can clog pores and trigger acne flare-ups. Dr. Sonia Badreshia-Bansal adds that reused, uncleaned sponges can cause irritation and even skin infections in sensitive skin.
Common mold types found on neglected sponges — like Aspergillus, Cladosporium, and Penicillium — have been linked by dermatologists to breakout conditions such as perioral dermatitis and folliculitis.
Yet most people skip this step. Surveys suggest around 39% of women clean their makeup tools less than once a month, and roughly 22% never clean them at all.
The takeaway is simple: a clean sponge protects your skin and gives you a smoother, streak-free finish.
How often should you clean a beauty blender?
Cleaning frequency depends on use. Here’s the expert-backed schedule.
| Task | How often | Why |
|---|---|---|
| Quick rinse | After every use | Removes the bulk of fresh makeup before it sets in the foam |
| Deep clean | Once a week (twice if used daily) | Breaks down trapped oil, product, and bacteria the rinse leaves behind |
| Replace | Every 3 months | Even with perfect care, micro-wear creates spots bacteria can hide in |
Rule of thumb: New season, new sponge. Replacing your beauty blender roughly every three months is the sweet spot most dermatologists and the brand itself recommend, though heavy users may need a fresh one sooner.
What you’ll need
You don’t need anything fancy. Pick one cleanser option from the list below.
- Lukewarm running water
- A gentle cleanser — options include:
- A dedicated makeup sponge/brush cleanser
- Mild baby shampoo
- Gentle liquid hand or castile soap
- A few drops of mild dish soap (for stubborn buildup)
- Optional: a cleansing mat or textured mitt for a deeper scrub
- A clean towel and a ventilated spot to dry
Avoid bar soaps — they can leave a film inside the foam.
How to clean a beauty blender: 6 methods
Method 1: The everyday quick clean (after each use)
This is your daily habit. It takes under a minute.
- Rinse the sponge under lukewarm running water right after you finish your makeup.
- Squeeze gently and repeatedly until most of the product washes out.
- Squeeze out excess water — never twist or wring.
- Set it down to air-dry in the open.
This stops fresh makeup from drying into the foam, which makes the weekly deep clean far easier.
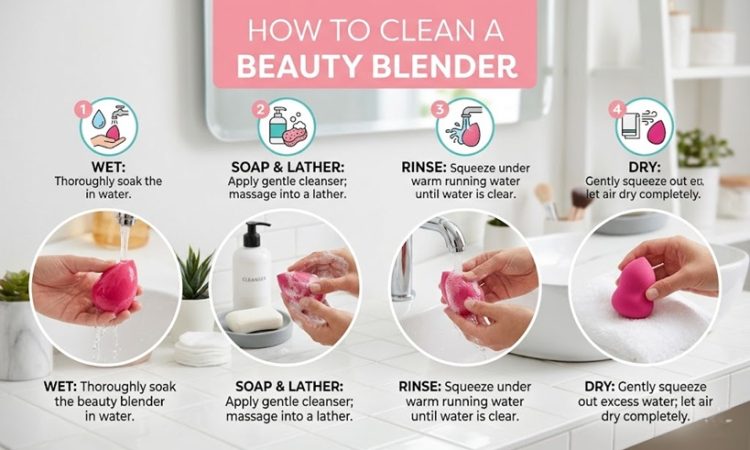
Method 2: The weekly deep clean (soap and water)
This is the core routine — the one to master. It removes what the daily rinse can’t.
- Wet the sponge. Hold it under lukewarm water until it swells to full size. This opens the pores.
- Apply cleanser. Squeeze a pea-sized amount of soap or cleanser onto the sponge (or onto a cleansing mat).
- Lather and massage. Gently squeeze, roll, and press the cleanser deep into the foam. Focus on stained areas. You’ll see the water run colored.
- Rinse thoroughly. Run it under clean water, squeezing repeatedly, until the water runs completely clear.
- Check the core. Squeeze hard — if colored water still comes out, repeat steps 2–4.
- Squeeze and dry. Press out excess water in a clean towel, reshape the sponge, and air-dry.
Pro tip: Don’t stop when the surface looks clean. Keep going until the squeezed-out water is clear. That’s your real finish line.
Method 3: Specialized cleanser or cleansing mitt
Sponge brands make cleansers formulated for their foam — solid cleansers, liquid cleansers, and textured mitts for breaking up stubborn stains.
These condition the foam as they clean and are gentle enough for makeup brushes too. If you want the lowest-effort option that protects the sponge’s texture, this is it.
Method 4: The viral microwave hack — does it actually work?
You’ve probably seen this one on Twitter/X, TikTok, and Reddit: drop your sponge in a mug of soapy water and microwave it for about a minute.
The real-user verdict is genuinely mixed. Many people swear it blasts out caked-in foundation better than hand-washing. Others reported the sponge balling up, going lumpy, or even melting. One UK beauty editor who tested it found the microwave cleaned no better than her usual soap-and-scrub method.
If you try it, treat it carefully:
- Use a microwave-safe mug, fully submerge the sponge in soapy water, and don’t overfill.
- Microwave in short bursts (around one minute) and watch it.
- Do NOT squeeze it straight out of the microwave. Multiple users burned their hands on boiling water. Let it cool completely first.
Important: The beauty blender brand itself advises against microwaving (and against vinegar). So this is a use-at-your-own-risk hack, not an official method. For a guaranteed safe clean, stick to Method 2.
Method 5: Oil-based spot cleaning for stubborn stains
For greasy, set-in foundation that soap won’t shift, oil cuts oil.
- Massage a small amount of a gentle facial oil or a few drops of olive oil into the stained area.
- Let it sit for a minute to loosen the makeup.
- Follow immediately with your regular soap-and-water deep clean to remove the oil.
Use this occasionally for tough spots, not as your everyday routine.
Method 6: The washing machine method (use with care)
Some people machine-wash their sponges. It’s not the gentlest option, but it works in a pinch.
- Place the sponge inside a mesh laundry bag.
- Run a gentle/cold cycle with mild detergent.
- Air-dry fully afterward.
Hand-washing is still the recommended default. Reserve the machine for when you’re cleaning several at once.
How to dry a beauty blender (without growing mold)
Drying is the step people get wrong — and it’s where mold begins. A damp, stored sponge is “a good trifecta for mold,” in the words of dermatologist Dr. Kellie Reed: darkness, low oxygen, and moisture.
Here are three safe drying methods.
| Drying method | How to do it | Best for |
|---|---|---|
| Air-dry (classic) | Squeeze out water, reshape, place on a paper towel or mesh rack in a ventilated spot | Everyday use; gentlest on the foam |
| Towel-assisted | Wrap in a clean dry towel and press to pull out moisture, then air-dry the rest | Humid climates; faster |
| Fan-assisted | Place near a low-speed fan for gentle airflow | When you need it dry quickly |
Drying rules to live by:
- Never store a sponge while it’s still wet.
- Don’t dry it in a closed, humid bathroom.
- Keep it out of direct sunlight and harsh heat.
- Dry it upright or in open air, never sealed in a bag overnight.
How to store your beauty blender
Storage is mold prevention, part two.
- Keep it in a cool, dry, well-ventilated spot.
- If it must go in a bag, use a mesh pouch so air can circulate.
- A ventilated holder or open container beats a sealed plastic case.
- A small silica gel packet near your sponge helps absorb leftover moisture.
The golden rule: never seal a damp sponge in a dark, airless space.
When to replace your beauty blender: 7 warning signs
Even a perfectly cleaned sponge has a shelf life. Toss it and start fresh if you notice any of these:
- Visible mold — dark spots, fuzz, or speckling inside the foam (discard immediately).
- A musty, sour, or “wet dog” smell that won’t wash out.
- Discoloration or stains that survive a deep clean.
- Tears, crumbling, or chunks breaking off.
- The foam feels hard, stiff, or dry instead of bouncy.
- Your makeup suddenly looks patchy or streaky.
- It’s simply older than 3 months.
If you even suspect mold, don’t try to rescue it. Throw it out.
Common beauty blender cleaning mistakes to avoid
Dermatologists say these are the slip-ups that cause breakouts.
- Not cleaning often enough. This is the #1 mistake, per dermatologists Dr. Jaliman and Dr. Badreshia-Bansal. Waiting weeks between cleans lets bacteria pile up.
- Stopping at “no visible makeup.” Surface-clean isn’t hygienically clean.
- Storing it wet. The single biggest cause of mold.
- Twisting or wringing the sponge. This tears the delicate foam structure.
- Using bar soap or harsh cleansers. They leave residue or break down the foam.
- Keeping it forever. No amount of cleaning replaces a 3-month swap.
What real users say (insights from the forums)
Beyond expert advice, here’s what everyday users on Reddit, Quora, X, and beauty blogs have learned the hard way:
- The microwave hack divides people. Tester blogs and viral threads show some sponges came out spotless — and others came out melted or misshapen. The most repeated warning: don’t squeeze it hot.
- Facial spray as a dampener. A popular community tip is misting the sponge with a facial spring water or setting spray to dampen it before makeup, instead of soaking it.
- The “squeeze test” is the trusted check. Experienced users judge cleanliness by squeezing the dry interior — if anything dark or smelly comes out, it goes in the bin.
- People keep sponges way too long. A common confession across forums is realizing a sponge was months (or years) past its prime once they cut it open and saw the core.
The consensus from real users echoes the experts: clean it gently, dry it fully, and don’t get attached.
Myths, busted
- “Microwaving sanitizes it perfectly.” Mixed at best, risky at worst. The brand says don’t.
- “Vinegar deep-cleans it.” The brand specifically advises against it — it can damage the foam.
- “Freezing it improves your makeup.” Makeup artists found no real difference, and it can trap bacteria.
- “If there’s no visible makeup, it’s clean.” False — that’s when bacteria are most concentrated.
- “It lasts a year if you wash it.” No. Replace roughly every 3 months regardless.
Frequently asked questions
How do I clean a beauty blender quickly?
Wet it, work in a small amount of gentle soap or cleanser, massage until the water runs clear, rinse, squeeze out the water in a towel, and air-dry. A daily version is just a thorough water rinse after each use.
How often should I clean my beauty blender?
Rinse it after every use and do a full deep clean once a week — twice a week if you use it daily.
What’s the best thing to clean a beauty blender with?
A cleanser made for makeup sponges is ideal. Baby shampoo, gentle liquid soap, or a drop of mild dish soap also work well. Avoid bar soap and harsh chemicals.
Can I clean a beauty blender with just water?
Not effectively. Water removes surface pigment but leaves oils and buildup trapped in the foam. You need a cleanser to break those down.
Can you put a beauty blender in the microwave?
The hack exists and works for some people, but the brand advises against it and many users have melted or burned theirs. If you try it, let it cool fully before squeezing.
How do I get a stained or discolored beauty blender clean?
Try an oil-based spot treatment (a little facial or olive oil), then deep clean as normal. If stains won’t budge after that, it’s time to replace it.
How long does a beauty blender last?
About 3 months with good care — sooner if you see mold, tears, odor, or stiffness.
How do I know if my beauty blender has mold?
Look for dark spots or fuzz inside the foam and check for a musty smell. If you see or suspect mold, throw it away immediately.
Why does my beauty blender smell?
A sour or musty odor means bacteria or mold from trapped moisture. Deep clean and dry it fully — if the smell stays, replace it.


